2023 Chip Budding Results
What follows is a brief review of the basic principles of chip budding and an assessment and lessons learned from chip budding executed during August and early September of 2023. Usually chip buds can be unwrapped after three weeks to examine success of chip buds. At that time I usually mark them with Doc Farwell's Seal and Heal grafting compound (a dab above and below the chip bud) to make it easier to find them to cut back growth above the chip to force growth of the new shoot in April.
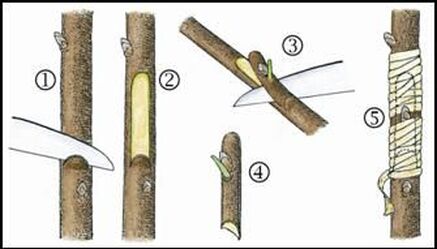
To the left is the classic graphic representation of the steps in the chip budding process.
Note in #1 that in the first cut (at about 20 -45 degrees) a shelf is created by tilting the knife out slightly away from the understock. This shelf will hold the chip (#4) in place while one gets their wrapping material out.
Note in #2 that the cleft/notch for the chip has parallel sides. The chip (#3) needs to approximate as closely as possible the cleft in shape and size so that the cambium layer of each can touch along as much cut surface of both as possible.
Note that the artist's depiction of the bottom of the chip (#4) kind of looks like the bottom is cut at an angle, but it is actually perpendicular to the chip, just like the cut on the undestock in #1 and #2 (which shows a cleft with parallel sides and bottom with that is perpendicular to the sides). #5 shows the wrapped chip bud when using raffia fiber or a budding rubber (bud must be left exposed when using either of these). Today in the U.S. we are more likely to use parafilm or polyfilm for wrapping, in which case the bud is usually covered.
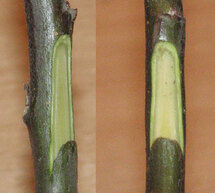
On the left are photographs of the cleft/notch created (#2 above) to receive the chip.
Note substantial shelf created to hold the chip in place while it wrapped.
The cambium layer is green and lies between the bark layer and the center heartwood.
Sometimes you will see instructions for chip budding that start with creating the chip as the first step, but creating the cleft/notch first is probably more common among most chip budders.
|
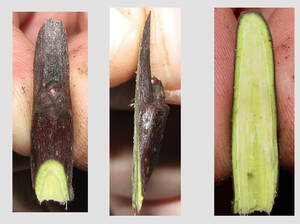
To the left are three photographs of the chip bud to be placed into cleft/notch created on the understock.
The left photograph shows the cut surface at the bottom of the chip that corresponds to the shelf created on the rootstock to receive the chip. A thin layer of cambium can be seen around the ark of the cut that corresponds to inner side of the shelf on the understock. The middle photograph shows a side view of chip showing how thin the chip actually is (it is really just a sliver of wood that has a resting bud that will emerge vigorously the following April). In this particular sequence of photos the leaf petiole is not present. I prefer to leave the petiole on as a "handle" to make it easier to hang onto the chip (although I usually shorten just before making the wrap over the bud). The rightmost photograph shows the inner surface of the chip. The cambium is is seen as a thin band of green tissue running around the periphery of the cut surface. When cutting the chip one tries to approximate the shape and size of cleft/notch in the understock as closely as possible. |
Cornell University Photo Hartmann & Kester Textbook Photo
As noted above, we try to match as closely as possible the chip with the cleft/notch created in the undestock. The idea is that the cells of the understock's cambium and the cells of the chip's cambium must create a callused union. A question discussed among chip budders is, "How close must they be size and shape to make this union?" Restated, "How close of a match is close enough?"
Above on the left is a photograph in a Cornell University depiction of a chip fitted in a cleft. It is a perfect fit (maybe too perfect - can that kind of fit actually be achieved when chip budding with real-world slightly wiggly understock and chips removed from the typical slightly narly bud stick?). Maybe the real world is better represented by the photograph above on the right that is used in the current edition of Hartmann and Kester's Plant Propagation: Principles and Practices. This photo shows substantial gap between the chip and the notch/cleft created to receive the chip (Did they pick a photo that somewhat exaggerated the size of permissible gap for purposes of illustration?). I have always felt that you should stive for a close fit (more like the photo on the right) so that you have a good union (quicker callusing with smaller gap) all the way around the chip.
How do you make corrections to get a better fit? If your chip is too long you can lengthen the cleft (or cut a new chip that is the right length). If your chip is too wide you can re-cut your cleft a little deeper into the understock (or cut a new chip that is the right width). If your chip is too short then you can simply cut a new one a little longer.
It should be noted before moving on that in no case do you want the chip to be wider or longer then the cleft because then it is not possible for the callusing process between the cambiums of the understock and the chip to take place.
Also before moving on, note that the Cornell University picture has you making the down stroke first and then following up with the angled 20 to 45 degree cut, which is the reverse of the depiction in the illustration above. It doesn't matter, however people do have preferences and habits. My preference or habit is to make the angled cut at the bottom first.
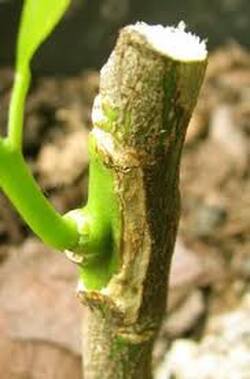
Example of apple chip bud on apple understock
The short section of pietole that was used to position the chip has fallen off during the formation of the callus union between the chip and the understock. The scar is visible (light brown - just above the end of the blue line marked #1)
One of the things we look for is green on the chip (#1). Right under the well formed bud we see green tissue (although the bark of the chip is dark brown).
This is a classic chip bud with very nice callus (#2) all the way around the chip. When you wound the cambium layer of the chip and understock with a knife cut they naturally try to heal the wound by creating a callus. When the two cut surface of the cambiums are in close proximity to one another they form a callus union.
The bud is non-active and will not grow out this season. Next season after making a cut just above the callus at the top of the chip (done in early April), the bud will form a shoot that grows 18 to 30 inches that season.
Note that the shelf kind of pouches out (that is from pushing it out with the knife after cutting the 20 to 45 degree cut at the bottom of the cleft/notch to receive the chip. That shelf is usually then held out away from the understock by an abundance of callusing tissue that forms a union between the shelf and the bottom cut surface of the inserted chip.
What you see here is the typical successful chip bud formed by closely matching (but not perfectly matching) the chip and cleft/notch like what is pictured in the Hartmann & Kester textbook photo.
Example of apple chip bud with near perfect match between chip and understock
Both the chip bud above and the chip bud to the left are typical of strong, healthy chip bud attachment. Both will push out strong healthy shoots from the buds on the chips that successfully attached to understock through the callusing process.
The differences observed between the two examples are due to the degree of match between the size/shape of the chips and the clefts/notch into which they were inserted. The chip to the left had a very high degree of match (almost perfect) with the understock cleft much like what is depicted in the Cornell University photo, while the apple chip bud example above had more of a margin space (not as precise of match) between the chip and the cleft/notch into which is was inserted (depicted by the photo up above from the Hartmann & Kester propagation textbook). When there is a less precise match between the chip an the cleft/notch in the understock (example above) you see the callus material that bridges the chip and the understock. Where there is a precise match like the one to the left you don't see the callus material but it is still there forming a union between the cambium of the chip and the cambium of the understock.
At a practical level, both the chip bud to the left and the one above will be successful and over time as the new stoots emerge frow for the next season almost no discernable difference will be observed in the appearance of the unions between chip understock.
Below are some examples where the unions between chip and understock have not been as perfect in terms of match of chip and understock as these two apple chip/understock combinations, but will also be successful, never the less.
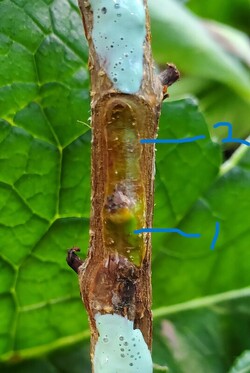
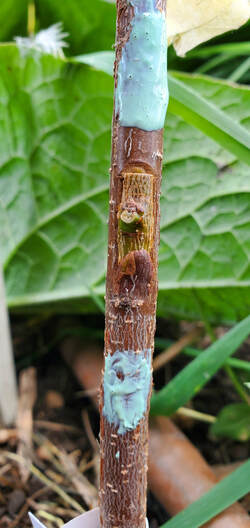
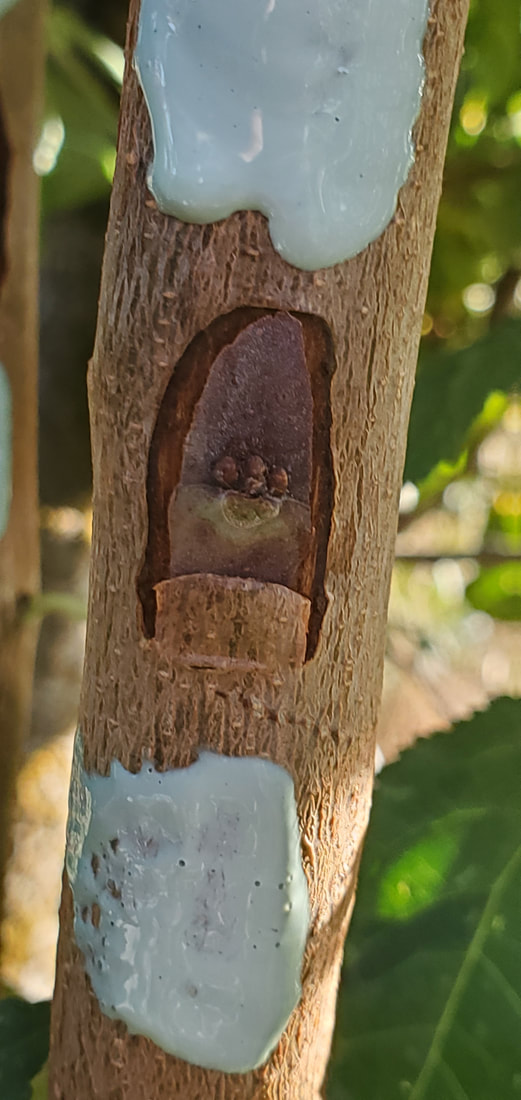
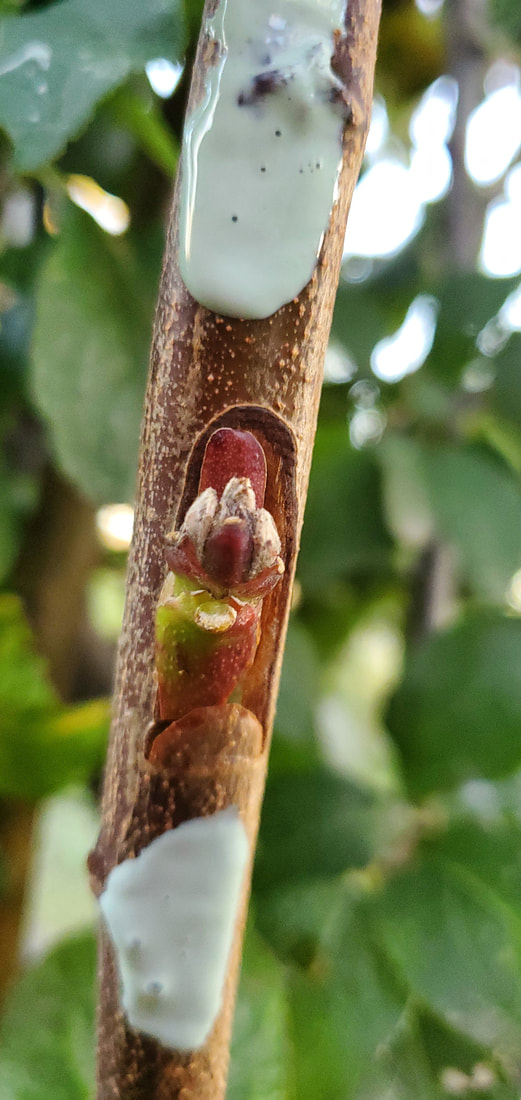
Example of Asian plum chip on Prunus Americana understock
This chip and its corresponding cleft/notch were a very close match (much like the Hartmann and Kester photo up above) so that very little callusing material is visible. There is only a small margin of exposed callusing material between the understock and the chip starting just above the blue line marked as #2 and proceeding in an ark above the top of chip.
Note how nice and green the chip is (#1 points the the green area just below the bud). If the chip had failed you would not see any green and the edges of chip would usually curl out away from the understock.
If you look carefully at the bud area you see that there are several small buds below a larger bud (which will become the main shoot next season). These smaller buds are flower buds and is typical for stone fruit that bear on last year's wood (as is the case with this Asian plum). The flower buds are removed when they appear as fruit blossoms in the spring, leaving only the main bud which forms a shoot that provides 18 to 36 inches of growth after the understock is cut off just above the chip in early April.
The green goop on the understock that is above and below the bud is Doc Farwell's Seal and Heal used to help mark where the chip bud has been placed on the understock. This makes it much easier to find it when removing the top of the undestock next April.
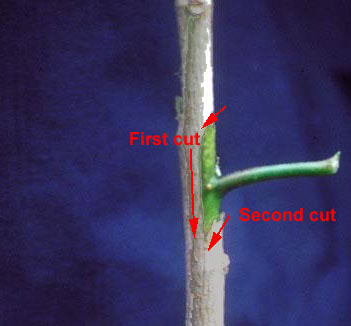
Removing the top of the understock in April (earlier if you live in Zone 7 or 8)
In our climate (Zone 5) chp budding takes place in August and the bud remains dormant until the following spring. As the understock becomes active in early April the top of the understock above the chip is removed with a slating cut (away from the side the chip is on). This results in the bud "pushing" out and creating 18 to 30+ inches of growth in the first season.
The photo to the left is one I found on the internet so it is not exactly as I would have cut it. I would go closer to the chip (but not into the chip).
If it is a stone fruit chip bud and flower blossoms emerg below the shoot they should be removed.
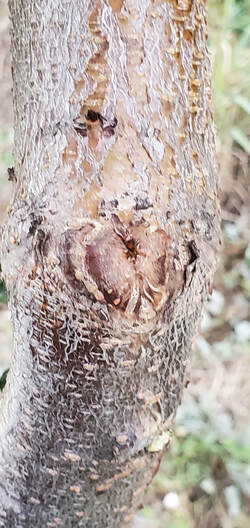
Example of chip bud union after three years
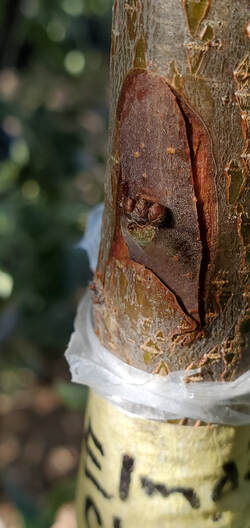
In August of 2021 a chip bud of a peach was placed on limb of a St. Julian A rootstock. In April of 2022 I cut off the understock just above the chip (further down nearer the chip than in the picture above). In 2022 the shoot from the chip grew about 30 inches and branched out. In 2023 it produced four peaches. The photo to the left shows the union in October 2023. You can see where the understock was cut in April of 2022. In a couple more years you won't be able to see that hole because it will be covered over. You will still be able to tell where the union is because the peach has tan colored bark and the St. Julian A understock is more bluish.
In August of 2021 a chip bud of a peach was placed on limb of a St. Julian A rootstock. In April of 2022 I cut off the understock just above the chip (further down nearer the chip than in the picture above). In 2022 the shoot from the chip grew about 30 inches and branched out. In 2023 it produced four peaches. The photo to the left shows the union in October 2023. You can see where the understock was cut in April of 2022. In a couple more years you won't be able to see that hole because it will be covered over. You will still be able to tell where the union is because the peach has tan colored bark and the St. Julian A understock is more bluish.
Example of clipped top of chip (to shorten it to fit the cleft)
When a chip budder is sizing the chip to fit the cleft created to receive the chip and they mismatch because the chip is too long, there are two options:
1. Cut a new chip that is the right size.
OR
2. Elongate the cleft to accept the chip.
But some chip budders resort to a third option - shorten the chip at the top with a quick perpendicular cut. The problem with this quick fix is that you risk not getting enough callusing activity around the chip for it to survive and thrive (you have eliminated the chance for callus cells to form between the squared off top of the chip and the arched section at the top of the cleft). To the left is an example of a shortening of the chip at the top that worked out ok. This chip is nice and green and pretty likely to be successful. I have seen You Tube videos that offer this as a standard practice, but usually avoid it and try to do either option 1 or option 2 above.
So this is a "not recommended" practice that probably works most of the time (as in the example to the left).

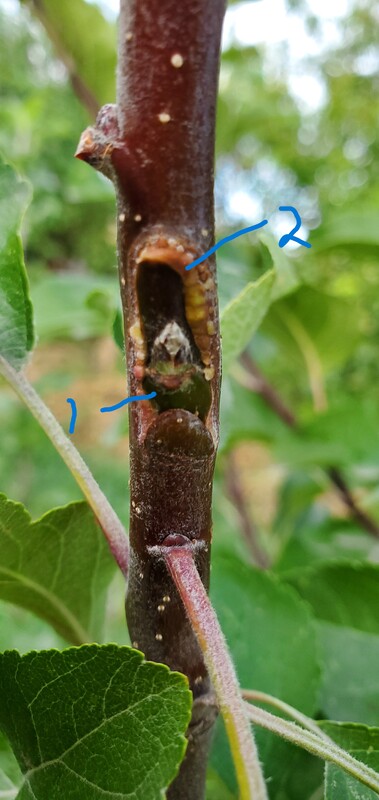
Example of candidate for failure that has survived so far (even though everything is wrong with this)
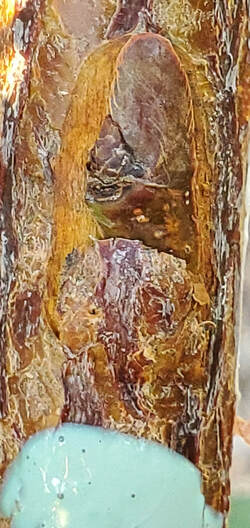
This chip slipped when it was being wrapped and I didn't catch it (but it survived anyway)
We know that it is still alive by the greenness observed throughout the chip especially right under the pietole scar (#1).
The slip is most evident by the hugue overlap (chip out beyond the boundary of the cleft) at the top (#4). One of my obsessions is to never, never allow the chip to extend out beyond the cut of the cleft (either at the sides or the top) because the cambium of the chip can't possibly form a callus union with the undestock cleft if it extends out beyond the cambium of the undestock. There is no callus union in the overhang (#4) and open space (#3) between the upper left edge of the cleft and chip.
The reason this chip has not failed yet is that there is a callus union at the bottom (inside the shelf, about half way up on the left side and about half way up on the right side). Apparently that is enough to keep the chip nice and green for now. It actually has a good chance of survival, even though it doesn't have 100% contact.
Now look closely at what #2 two is pointing to. The formerly cut surface of the cambium of the understock has callused (healed) over so that it does not dry out. What makes chip budding (and grafting for that matter) work is that when you cut cambium tissue it immediately strives to heal the wound by forming a callus. When the wounded (cut) cambium of the understock is in close proximity to the wounded (cut) cambium of the chip they form a callused union. As a result of the callused union of two cambiums, the chip and its bud receives nutrients from the understock.
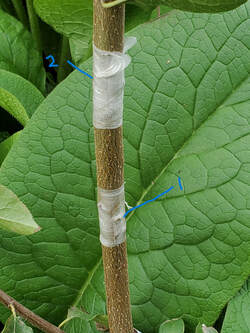
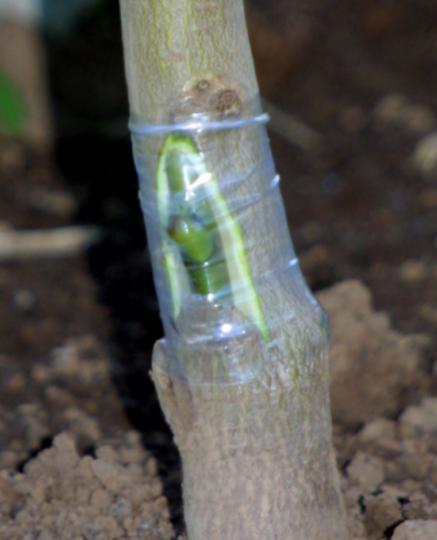
Example of two (or more) chips on one understock
You can see the outline of a chip that has been placed facing off to the right (#1).
Underneath the parafilm at location #2 is another chip.
I did two chips on the same understock as an insurance policy - if one of them did not take then probably the other one would be ok. If both buds fail to take then I would use a cleft graft in April.
I might also use this technique if I were wanting to create a multi variety plum tree. Usually when you make a multi variety tree you space the buds by 2 to 3 inches and have them go different directions.
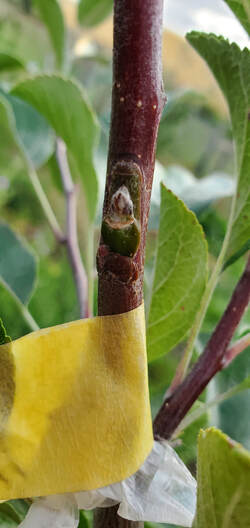
Sometimes you don't get much green - is the thing even alive?
In the above examples the chips either had green or had the appearance of life. But sometimes you just have to give it a chance and see if it makes it.
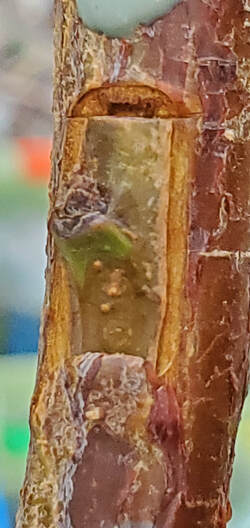
When examining the chip to the left it did not appear to have any green, especially with European plums which tend to have a dark brown, almost purple bark. But the enlarged photo showed some green just under the petiole scar.
Note the four buds, three of which are probably flower buds.
In the above examples the chips either had green or had the appearance of life. But sometimes you just have to give it a chance and see if it makes it.
When examining the chip to the left it did not appear to have any green, especially with European plums which tend to have a dark brown, almost purple bark. But the enlarged photo showed some green just under the petiole scar.
Note the four buds, three of which are probably flower buds.
Big gap on one side - will it make it?
On the side you are viewing there is a big gap running up the entire right side, but it has a good union over on the left, at the top, and at the bottom. The buds look heathy and there is some green showing below them.
Will it make it? We will wait and see whether it is alive and ready to thrive next April.
If not wide enough, place on one side.
This was a narrow chip that was place to one side rather than in the middle of a wide expanse. I appears to have formed a good union on both side, as well as the top and bottom so it has a good chance of surviving and thriving. Generally when our chip is too narrow we should cut a new chip, but in this case it worked out. It is kind of the same principle in cleft grafting where you place the scion on one side or the other of the wide cleft, but never in the middle.
This was a narrow chip that was place to one side rather than in the middle of a wide expanse. I appears to have formed a good union on both side, as well as the top and bottom so it has a good chance of surviving and thriving. Generally when our chip is too narrow we should cut a new chip, but in this case it worked out. It is kind of the same principle in cleft grafting where you place the scion on one side or the other of the wide cleft, but never in the middle.
Revisiting the solution of a chip that is too long - should you square off the top?
Although you should take the time to elongate the cleft when you have a long chip, the quick and easy slice across the top of the chip is successful most of the time. In the example to the left there is a pretty good union all the way around, including the top, so I was rewarded for cutting corners (pun intended).
Note how green the chip is.
Example of Peach chip bud
Apples and pears usually have a single bud that lies very close to the chip. Asian plums often have a couple of flower buds along with the bud that will form the 18 to 30 inches of growth next year.
Note how protruding peach buds tend to be. One of these is the bud that will form the shoot for 2024 growth and the others are probably flower buds.
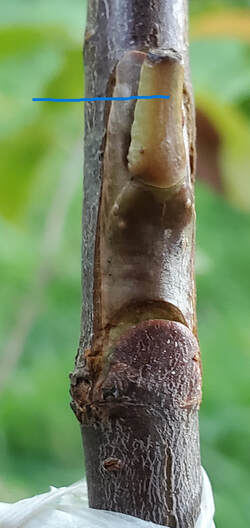
What happens to the leaf petiole?
Most of the time when you unwrap the chip bud for inspection the leaf petiole all shriveled up and is embedded in the parafilm wrapping material and falls to the ground with the parafilm. But occasionally it is still in place (although in the process of shriveling up and separating from the chip) as is the case in the photo to the left. This is a cherry which has a large bud, but unseen behind the drying petiole (blue line points to it).
Now shift down to the photo below (same chip).
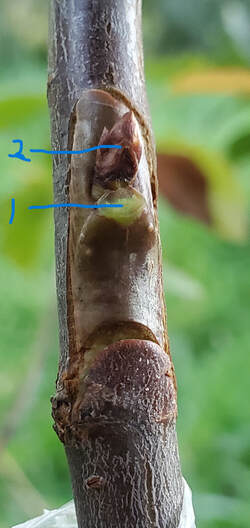
Bud no longer hidden - leaf petiole fallen off.
#1 marks the leaf scar where the leaf petiole was attached (see photo above).
#2 points to the cherry bud that was hidden (when viewed from in front) behind the petiole. Next season in April that bud will push out (after top of understock is removed just above the bud) and form a shoot that will be 18 to 30 inches in length by the end of the 2024 growing season.
Some buds lie fairly flat up against the chip (e.g., apple and pear), while others protrude (e.g., cherry, peach, apricot).
[This is the first time I have chip budded cherry and I left a much bigger leaf petiole than I do for other kind of fruit because of the very large bud (I was using the large section of petiole to protect it.). A smaller section of petiole would have dried and shriveled up faster and would have separated by now. Next year I will probably shorten the petiole on cherries because it wasn't really necessary to protect the bud even though it protrudes out quite a bit.]
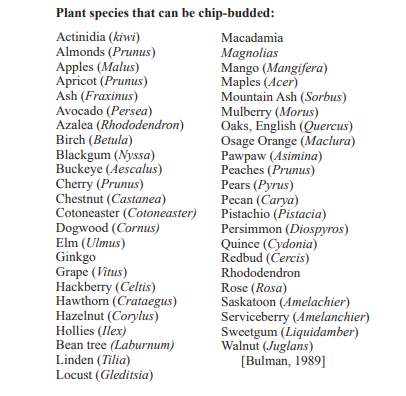
What else can you chip bud besides fruit trees? Quite a lot.
In conclusion, here is a list(on the left) of the many plant species that are commonly chip budded as a method of propagation.
In conclusion, here is a list(on the left) of the many plant species that are commonly chip budded as a method of propagation.
