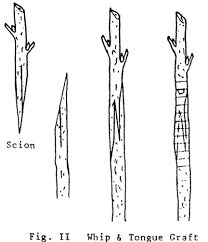
Whip and Tongue Grafting Procedure
The whip and tongue grafting procedure is the most common bench grafting technique and can also be used for topworking fruit trees where there are pencil-sized limbs for grafting to. Whip and tongue may also be used in field grafting of lined out rootstock.
1. Read pages 464 to 471 in Chapter 12 of Hartmann and Kester's Plant Propagation (see link below). Those pages cover the whip and tongue grafting technique and the splice (whip graft) which is a whip without a tongue. Bench grafting with the whip and tongue technique involves dormant rootstock and dormant scions. After grafting, the grafted units (the rootstock and attached scion) are placed in storage for callusing at between 40 and 70 degrees for a couple of weeks and then kept at cold storage temperatures of about 35 degrees (to prevent breaking dormancy) until time to set out in late April when danger of severe frost is past. Here is the link to Chapter 12:
http://aggie-horticulture.tamu.edu/faculty/davies/pdf%20stuff/ph%20final%20galley/M12_DAVI4493_00_SE_C12.pdf
2. There are also good discussions with diagrams and pictures of whip and tongue grafting in:
Reproducing Fruit Trees by Graftage: Budding and Grafting (from U. of Kentucky Extension).
Grafting and Propagating Fruit Trees (from Penn State Extension). See page 6.
Grafting and Budding Nursery Crop Plants (from NC State University).
|
|
|
|
|
|
To download a Word document covering the whip-n-tongue grafting technique click here.
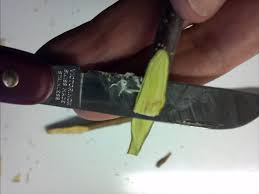
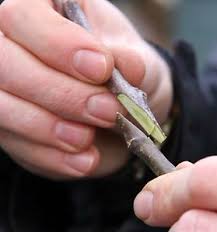
Making the whip and tongue cut - the true test of sharp grafting knife: The bevel on the grafting knife is crucial to a controlled cut that flat across the entire surface of the cut. For a right-hander the two pieces of the whip and tongue are cut in the following fashion: the rootstock or scion is held in the left hand close to the chest and the right-handed knife pulled across the chest to the right. The right-handed knife's bevel gives you control to dig in just right and not skate across the rootstock or schion, requiring some corrective cutting. If you want to cut away from your self with your right hand (vs. cutting across your chest) then you need a left handed knife to get the control needed (better to master the correct right handed pull than the incorrect push stroke with the right hand).
Here is a great You Tube to see the proper method of cutting for a right-hander using a right-handed knife:
www.youtube.com/watch?v=OCaRqvoL6Lc
Especially note from 0.35 seconds to 1:55 seconds.
Note that he achieves the flat cut with a single stroke and that there is no corrective cutting when he grips the rootstock or scion in his left hand (stationary near his chest) and draws to knife across his chest to the right.
You do see a push stroke with his right hand on scions. That cut is not part of the whip and tongue. He is merely using his knife with that push stroke to cut excess scion wood after he has selected the section of scion he will use that has two buds above where he made the long slanting cut for matching scion to rootstock. Most of us would use hand pruners to make that cut, but since he has such a sharp knife he just uses a simple push stroke to cut off the excess scion material.
Photographs and Videos of Whip and Tongue Grafting by Whitney Grafting
Whitney Grafting, a Yakima firm that does grafting for commercial fruit and nut growers throughout the US, has maintained a Face Book page for its commercial customers since 2017. This FB page has some photographs and brief videos that can be very helpful to those of use with home orchards that need to graft from time to time, especially to topwork existing trees. You can get to that Whitney Grafting FB page here.
Below I have created an annotated listing of the FB dates where the picture or video illustrates the techniques involved in whip and tongue grafting.
1. March 5, 2018 Multi variety created using whip and tongue on well feathered host tree.
2. February 28, 2018 "Our hot wax . . . " Video of using hot wax to seal the scion and masking tape wrapping the scion-rootstock union.
3. February 28, 2018 "Anacita making it look easy . . . " Video showing whip and tongue knife technique.
4. February 28, 2018 "Bernice has wrapped grafts before. Can you tell?" Video show wrapping grafts with narrow masking tape.
5. February 20, 2018 Movie showing field grafting of Pecan liners using the whip and tongue graft.
6. January 17, 2018 Muli variety Pecan created with whip and tongue grafting (14 varieties on one tree).
7. February 24, 2017 Shows complete process of making whip and tongue bench graft. Wrapping is done with narrow masking tape. Dipping in wax prevents the scion from drying out.
Other Notes:
Compressing & Sealing the Grafted Union:
In the You Tube on whip and tongue grafting above you saw a "tie-er" securing the union between the rootstock and the scion with para-film, starting at about 1:57 minutes into the video clip. Some grafters (who don't have the amazing precision displayed by the grafter in the video) might apply more pressure to the union with budding rubber (3/8" by 8" is the best size for manipulating) and then cover it with para-film, poly-film, or a sealer such as wax, Doc Farwell's Seal & Heal (my favorite sealer), or one of the asphalt-based sealers.
[Note on Buddy Tape: Since it is so important to seal all cuts on whip and tongue grafting and chip budding, I am have used all of the techniques available. I even bit the bullet and spent a whole lot of money for some Buddy Tape, proprietary version of para-film. Is it worth it? You can find discussions (also arguments) about which method of covering a grafting wound on the web. I used it for the first time this past August when I did about 70 chip buds. I really, really liked it. It was easier to use than another role of parafilm that I had and way, way easier then poly-film (even though Stephen Hayes quite effortlessly uses it in his You Tubes on grafting and says "it is really no harder than tying your shoes" - https://www.youtube.com/watch?v=jZHsus9qGlA ) and gave a better seal than a budding rubber (you can't cover the bud itself with a budding rubber).
Later at about 2:49 minutes to 3:25 minutes you saw the tie-er dipping the top end in wax to prevent the end of the scion from drying out. Instead of dipping in wax that end might also be covered with one of the sealers mentioned above.
Rootstocks for Apples:
Note on condition of rootstock: While the scion wood should be in dormant condition at the time of grafting, the rootstock should have had about a week of room temperatures so as to begin cambial activity. When the cambium cells are actively dividing the more quickly form the callusing that unites the cambium of the rootstock to the cambium of scion.
Note on preparation of the rootstock to plant: TRECO, the big provider of rootstock, notes in their catalog that prior to planting the rootstock that the roots should all be cut back to 1/2 to 3/4 inches of the rootstock shank. They note that this this helps the roots grow out straight and are not kinked or bent.
Note on selection of rootstock for apples: If you will be planting the trees in the Pacific Northwest be sure to select rootstocks (like the Geneva series e.g., G. 890, G. 935, G.210, or G.202, or G. 41) so that you get resistance to fire blight.
Here is a quick summary of why you might choose the G. 890 as your rootstock for grafting:
1. It had crucial resistances to every significant apple disease, including fire blight.
2. It is well anchored (that is also a big deal). It has a great yield efficiency (for the amount of leaf surface it gives a lot of apples). This good root system allows this semi-dwarf to be vigorous, while still remaining contained.
3. It has an excellent yield efficiency (a lot of fruit to the amount of leaf surface).
4. It produces a semi-dwarf tree. This is a real plus for home gardeners because you can fit a lot of different heritage apples into the same space in the backyard.
5. It induces slightly earlier bearing (precocity) than full-sized rootstock. This is an especially important characteristic of the Geneva series that are more dwarfing the the G. 890.
6. It is "nurseryman friendly" and can be propagated for us in large numbers (some of the Geneva series are known for the difficulty in propagating them).
For sources of rootstocks check out this page.
Selecting a Grafting Knife
You can see a discussion of grafting knives here.
